
Thursday, August 12, 2010


Sunday, August 8, 2010
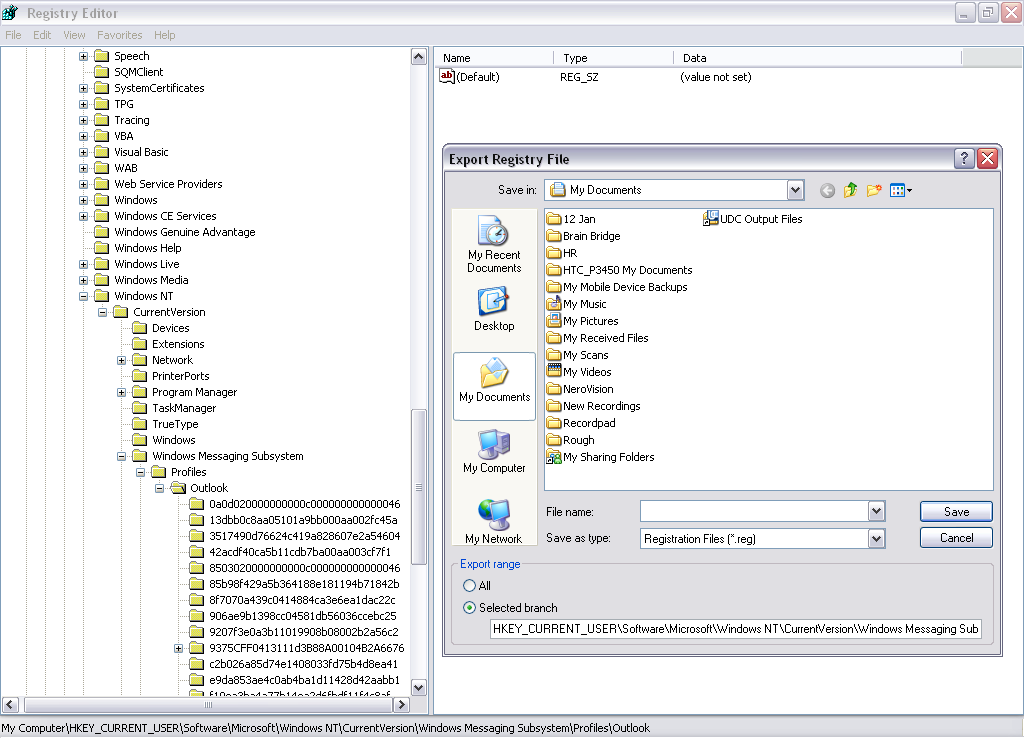
Backup/Export Account Settings - Outlook 2007
Backup/Export Account Settings - Outlook 2007
- Start > Run > type ‘regedit’
- Locate the following path in your ‘Registry Editor’
- HKEY_CURRENT_USER\Software\Microsoft\Windows NT\CurrentVersion\Windows Messaging Subsystem\Profiles\Outlook
Monday, August 2, 2010
DBX file extension Outlook Express E-mail Folder
Saturday, July 31, 2010
I'll show you how to move from Outlook Express to Windows Live Mail on Windows 7 (the easiest moving option), step by annoying step.
I get variations of this question a lot since Microsoft made the decision to
remove Outlook Express - or any email program for that matter - from Windows
7.
Unfortunately, Outlook Express is not available for Windows 7.
That means it's time to migrate to a different email program.
In this (lengthy) article, I'll show you how to move from Outlook Express to
Windows Live Mail (the easiest moving option), step by annoying step. With lots
of pictures.
•
I'm going to assume that you're also switching machines. It's OK if you're
not; you'll get to skip a few steps, but for the most part this process applies
equally whether you're moving from one machine to another, or just upgrading an
existing machine to Windows 7.
In Windows XP
Don't worry if you've already upgraded to Windows 7 and XP's no longer
around. I'll address that in a moment. Particularly when you're moving
machines, though, there are a couple of things you can do before the upgrade to
make life just a tad simpler.
In Outlook Express, locate the "message store" folder. Click on the
Tools menu, Options... menu item,
Maintenance tab, Store Folder... button:

You can actually click-and-drag to select the store folder name therein -
just make sure to drag to the far right to get it all, then right click on it
and you can select copy:

It'll probably give you something very similar to this:
C:\Documents and Settings\LeoN\Local
Settings\
Application Data\Identities\
{99ABF0C2-AAC3-40FD-939D-73857B3D056C}\
Microsoft\Outlook Express
(Though all on one line, and of course some of the specific text will be
different.)
Open up Windows Explorer (Windows Key + E is easiest), and
paste that into the address bar and press Enter:

This entire folder, including all the files and subfolders within it must be
copied to your Windows 7 machine. It really doesn't matter how you do it; you
can burn a CD or DVD, copy to a flash drive or removable hard disk, or even
copy directly over the network. What matters is that the entire folder is
somehow copied to the Windows 7 machine.
Next, your address book.
In Outlook Express, click on the Addresses toolbar button,
then in the resulting Address Book Window, click on the File
menu, Export menu item, and Address Book
(WAB)... sub-menu item:

Enter a file name and save the address book export in some location. (You
may need to repeat this once for each identity you use if you use more than one
- be sure to select a unique name for each.)
All of these exported address books must now also be copied to your Windows
7 machine.
Finally, you'll need to note, save or record your email account
configuration, as there is no automated process to transfer it to your new
installation.
In Outlook Express click on the Tools menu,
Accounts... menu item, Mail tab. For each
account listed there click on the account and then the
Properties button.
In the General tab:

Take note of your Name and E-mail address
configured.
In the Servers tab:

Take note of all your settings here. If "My server requires authentication"
is checked, then click on the Settings... button and note all your settings in
the resulting dialog.
On the Advanced tab:

Take note of all your settings in this dialog as well.
If You've Already Left Windows XP
If you no longer have access to Windows XP - presumably because you've
upgraded to Windows 7 in place, then you'll need to:
Locate your Outlook Express store on your machine. You may be able to infer
its location from the examples above. Another alternative is to search your
machine for the file "Folders.dbx" - the folder containing that file is likely
the folder you'll need to use below. No need to copy it, simply note its
location for use later.
Locate your old Windows Address Book. In Windows XP its in a folder similar
to:C:\Documents and Settings\LeoN\Local
Settings\
\LeoN\Application Data\Microsoft\Address Book\LeoN.wabAll on one line, and with your login name instead of mine. If you had
multiple identities in Outlook Express there may be more than one. I find it
easiest to once again search, this time for "*.wab" to locate all the Windows
Address Books. And once again, no need to copy, simply make note of where you
found them.
You'll need to remember your account configuration, or get it again from
your ISP or email service provider.
Windows 7
Windows 7 does not come with an email program, so you'll need to download
and install one.
We'll go get Windows Live Mail, which is similar to Outlook Express, and a
free download from Microsoft.
Visit Windows
Live's download page:

Download and run the Windows Live installer. (You may have to confirm with
Windows 7 UAC.) It'll present you with a list of optional components you can
install:

Uncheck everything except Mail. (That is, unless
you know you want some of the other components. You can also add them
later.)
Click Install. Upon completion of the install (it can take
a while), uncheck all the additional options you're offered -
we just want mail. (Unless, of course, the options are actually things you
want. If you're not sure, uncheck them - you can add them later once you
decide.)
It's also up to you if you want to create a Windows Live ID. Given that
we're moving your existing email accounts, it's not required that you set up a
new one.
Off the Start menu, under All Programs you'll find
Windows Live, and within that Windows Live
Mail. Click that to launch Windows Live Mail (WLM).
The first time you start WLM it'll launch the "Add an E-mail Account"
process. Complete the process with the information that you saved from your
Outlook Express account configuration above. Upon successful completion it may
immediately download new mail - that's ok. It will also create an Inbox and
other folders for your newly configured account.
Coming from Outlook Express, you'll probably be much more comfortable with a
traditional menu bar in place. On the right side of the WLM window is an icon,
shown below. Click that and then click on Show menu bar:

Now, click on the File menu, Import menu
item, Messages... sub menu item. In the resulting dialog
box:

Choose Microsoft Outlook Express 6 and click Next.
In the next dialog - "Location of Messages" - click the
Browse... button and navigate to the folder that has your
Outlook Express messages that we saved or located above. This can once again be
on external media, or directly on your machine. Simply locate the folder
containing the infamous ".dbx" files. Click Next, make sure
"All folders" is selected in the resulting dialog, and click
Next again. WLM imports your email, after which you can click
Finish.
Your messages have been imported - but where did they go?
It's not obvious, what WLM does is set up a new "Imported Folder" folder
within the "Storage Folders" in the program:

All your messages are here. You can now manage them as you see fit, perhaps
leaving them there, perhaps dragging and dropping them into other folders -
whatever you like.
Last but not least: the Address Book.
In Windows Live Mail, click on Contacts in the lower left:

That brings up the Windows Live Contacts application, into which we'll
import the old Windows Address Book.
Click on the File menu, Import menu item,
Windows address book (.WAB) sub menu item. It'll then prompt
you for the location of your ".wab" file. Navigate to the location containing
the .wab file you copied or located earlier and press OK.

That's really all there is to it. Your contacts are imported. You may need
to repeat for multiple .wab files if you have them.
Caveats
As complicated as all that may seem, conceptually it's fairly simple: move
mail, move address book, copy account settings.
There are a couple of lingering issues.
Windows Live Mail is not Outlook Express. It's similar, but there
are differences, and the differences will take a little getting used to. About
all I can suggest is that you be patient and embrace
change.
In particular, advanced usage of Outlook Express - such as using Identities
- may not be preserved. Windows 7 pushes the concept of completely separate
Windows user accounts over Identities within Outlook Express.
The good news is that after having set up Windows Live Mail on your Windows
7 machine, it makes migrating to other email programs such as Thunderbird or
Outlook that much easier should you decide to switch again later.
Outlook Express sending multiple copies of email messages
In this case, Outlook Express, which was perfectly fine previously, started sending multiple copies of each email. Some recipients reported getting the same message as many as 24 times. I found that the messages would get stuck in the Outbox and every time the program checked for new mail, it resent the same message. To make a long story short, the cause was that there were over 5,000 messages in the Sent box and it had reached its capacity. The solution was to copy any important messages in the Sent box to another folder. Then I closed Outlook Express and found and deleted the Sent box. I found it using Windows search function, looking for "Sent Items.dbx". I also deleted the "Outbox.dbx". All I had to do then was to restart OE and it recreated the two boxes. From then on, it was clear sailing.
I hope that any of you who may encounter this problem will have this solution work. If the Sent box is very full, this is probably the cause and solution. I have also found that some antivirus programs that scan email cause OE to act weirdly. Turning off the email scanning in the antivirus program can also sometimes solve this or similar problems.
Here is the instruction how to save and backup Outlook Express email messages for importing, exporting from one pc to another, or using the built in burner feature included with WinXP so you can burn a folder on your desktop to a CD.
Click on the TOOLS Menu and select OPTIONS.
Click the MAINTENANCE Tab and then click on Store Folder.
You now see the location of your Email Folder.
Highlite the Folder Location and press CTRL+C to copy the location.
Click Cancel and then Cancel again to close all boxes.
Click the Windows Start button and the click Run. In the open box press CTRL+V to paste the mail location, then click OK.
You now have a window containing your e-mail database *.dbx files.
From the top Menu click EDIT click Select All.
On the top Menu again click COPY. Now close the window.
Open Windows Explorer, click FILE / NEW and then FOLDER.
Type a name for the folder and hit ENTER.
Double click the Folder you just created to open it. From the EDIT Menu select PASTE. Close the window.
You have now completed a backup up of your email messages.
Now is the time to write them to a CD or CDRW for later use. In WinXP, to burn a copy of that folder to a CD, just do a right click of the mouse on the folder and choose the "Send to ... " drop down choice.... select the drive that has your blank CD or CD-RW in it all set to be burned to.... now you have a copy of your emails on the CD as a backup or to import into a new computer running WinXP....
I see that you have a very logical mind questioning why some people received multiple copies of your email and others did not. this had nothing to do, however, with how far away the people were.
The computer uses it's own sort of logic. Here's what happened. You send so many email that the Sent folder got full to its limit. Once that happened, every time you sent an email it was placed in the Outbox, waiting for transfer to the Sent box. But the Sent box was full, so even though the message was sent, it couldn't be moved to the Sent box and it remained in the Outbox. Outlook tries to send whatever is in the Outbox every time it tries to send/receive email. So, if you sent an email and closed the Outlook Express program right after that, the person got only one copy and the Outbox reset itself when you reopened the program. However, if the program remained open and if you sent other people email after you sent the first one or if the program tried to send and receive email as it usually does, every few minutes, the first email was resent over and over again.
Although this may sound a little confusing, it is actually very logical -- according to computer logic. Anyway, I hope this helps.
Outlook Express Mailbox Limits
Outlook Express apparently has a 2 gigabyte file size limit for its mailboxes.
Normally, that doesn't affect most people, but I've definitely seen reports of it doing exactly what you've described when the Sent Items folder approaches 2 gigabytes. Smaller emails might make it out for a while, but a larger attachment might be enough to exceed that size limit, and thus cause the problem.
My recommendation is to create a new folder - call it what you will; perhaps something like "SentArchive", and move all the messages in your Sent Items folder to the Sent Archive folder. That should a) retain all your sent messages should you need to refer to them, and b) empty the Sent Items folder so that this problem doesn't happen again.
SMTP Server for Qatar Net
SMTP Port : 25
Incoming Server (pop3) : mail.qatar.net.qa
Port : 110
Wednesday, July 28, 2010
What is Elevated command Prompt
EXAMPLE: Elevated Command Prompt
NOTE: Notice how the elevated command prompt opens to C:\Windows\System32 and not C:\Users\(user name) as the default command prompt without administrator rights.

Outlook Express sending multiple copies
For the past 3 days I have had problems with Outlook Express. When I send an email or respond to an email, it goes out (I can see the Nortan scanning window) and then automatically goes into my outbox and every time I check mail, it sends it out again and again and again. A friend told me that she got 42 copies of one of my emails.
Althoug the email goes out (repeatedly) it never shows up in the SENT mail box.
I have had to go itno the Outbox after each email and delete the smeil or move it to Drafts. It won't even allow me to drag it to sent mail.
Answer :
Try this, it worked for me.
On your OE got to Tools>accounts>mailtab>double click the account name>advanced tab
Uncheck the box marked "Break apart messages....."
Sunday, July 25, 2010
Outlook Express Back up
Step 1: Copy message files to a backup folder
Step A: Locate the Store folder
Start Outlook Express.
Click Tools, and then click Options.
On the Maintenance tab, click Store Folder.
In the Store Location dialog box, copy the store location. To do this, follow these steps:
Put the mouse pointer at one end of the box under the Your personal message store is located in the following folder box.
Press and hold the left mouse button, and then drag the mouse pointer across the Your personal message store is located in the following folder box.
Press CTRL+C to copy the location.
Click Cancel, and then click Cancel again to close the dialog box.
Step B: Copy the contents of the Store folder
Click Start, click Run, press CTRL+V, and then click OK.
On the Edit menu, click Select All.
On the Edit menu, click Copy, and then close the window.
Step C: Create a backup folder
Right-click any empty area on your desktop, click New, and then click Folder.
Type Mail Backup for the folder name, and then press ENTER.
Step D: Paste the contents of the Store folder into the backup folder
Double-click the Mail Backup folder to open it.
Right-click inside the Mail Backup folder window, and then click Paste.
Step 2: Export the Address Book to a .csv file
Important Make sure that you follow this step if you use multiple identities in Outlook Express.
Microsoft Outlook Express 5.x and Microsoft Outlook Express 6.0 use a Windows Address Book (.wab) file to store Address Book data. The individual data for each identity is stored in a folder by user name within the .wab file that is used.
The only way to separate the Address Book data for different identities is to export the data to a .csv file while you are logged in as a specific identity. If the .wab file becomes dissociated from the user identities, the data can be exported only as one total. In this case, the data cannot be exported folder by folder.
There is another reason to export the .wab file to a .csv file. If the .wab file not exported to a .csv file, but the .wab file is shared with Microsoft Outlook, the addresses are stored in the personal folders (.pst) file in Outlook. When you export the file to a .csv file by using the File menu in Outlook Express, the correct contacts are exported. However, if the Address Book is shared with Outlook, you cannot use the File menu option to export from the Address Book. This option is unavailable.
To export the Address Book to a .csv file, follow these steps:
On the File menu, click Export, and then click Address Book.
Click Text File (Comma Separated Values), and then click Export.
Click Browse.
Select the Mail Backup folder that you created.
In the File Name box, type address book backup, and then click Save.
Click Next.
Click to select the check boxes for the fields that you want to export, and then click Finish.
Click OK, and then click Close.
Step 3: Export the mail account to a file
On the Tools menu, click Accounts.
On the Mail tab, click the mail account that you want to export, and then click Export.
In the Save In box, select the Mail Backup folder, and then click Save.
Repeat these steps for each mail account that you want to export.
Click Close.
Step 4: Export the newsgroup account to a file
On the Tools menu, click Accounts.
On the News tab, click the news account that you want to export, and then click Export.
In the Save In box, select the Mail Backup folder, and then click Save.
Repeat these steps for each news account that you want to export.
Click Close.
Back to the top
How to restore Outlook Express items
Note To restore items when you use multiple identities in Outlook Express, you may have to re-create the identities before you follow these steps. Repeat each step as needed for each identity.
Step 1: Import messages from the backup folder
On the File menu, point to Import, and then click Messages.
In the Select an e-mail program to import from box, click Microsoft Outlook Express 5 or Microsoft Outlook Express 6, and then click Next.
Click Import mail from an OE5 store directory or Import mail from an OE6 store directory, and then click OK.
Click Browse, and then click the Mail Backup folder.
Click OK, and then click Next.
Click All folders, click Next, and then click Finish.
Step 2: Import the Address Book file
On the File menu, click Import, and then click Other Address Book.
Click Text File (Comma Separated Values), and then click Import.
Click Browse.
Select the Mail Backup folder, click the address book backup.csv file, and then click Open.
Click Next, and then click Finish.
Click OK, and then click Close.
Step 3: Import the mail account file
On the Tools menu, click Accounts.
On the Mail tab, click Import.
In the Look In box, select the Mail Backup folder.
Click the mail account that you want to import, and then click Open.
Repeat these steps for each mail account that you want to import.
Click Close.
Step 4: Import the newsgroup account file
On the Tools menu, click Accounts.
On the News tab, click Import.
In the Look In box, select the Mail Backup folder.
Click the news account that you want to import, and then click Open.
Repeat these steps for each news account that you want to import.
Click Close.
Back to the top
How to preserve the Blocked Senders list and other e-mail rules
For more information about how to preserve the blocked senders list and other e-mail rules, click the following article number to view the article in the Microsoft Knowledge Base:
276511 (http://support.microsoft.com/kb/276511/ ) How to back up and restore Outlook Express Blocked Senders list and other mail rules
Back to the top
Note This is a "FAST PUBLISH" article created directly from within the Microsoft support organization. The information contained herein is provided as-is in response to emerging issues. As a result of the speed in making it available, the materials may include typographical errors and may be revised at any time without notice. See Terms of Use (http://go.microsoft.com/fwlink/?LinkId=151500) for other considerations.
Monday, July 19, 2010
Enable - Disable Build In Administrator Accounts in Windows 7
Through a Elevated Command Prompt
NOTE: This option can be used in all editions of Windows 7.
1. Open a elevated command prompt.
2. To Enable the Hidden Built-In Administrator Account -
A) In the elevated command prompt, type
net user administrator /active:yes and press Enter. (See screenshot below)
B) Go to step 4.
3. To Disable the Hidden Built-In Administrator Account -
A) In the elevated command prompt, type
net user administrator /active:no and press Enter. (See screenshot below)
4. Close the elevated command prompt.
5. Log off, and you will now see the built-in Administrator account log on icon added (enabled) or removed (disabled) from the log on screen. (See screeenshot below)
NOTE: Click on the Administrator icon to log on to the built-in Administrator account.
Wednesday, July 14, 2010
Toshiba Drivers Download
Saturday, July 3, 2010
Message Protocols Used by Exchange 2000/2003
HTTP Support
IMAP4 Support
NNTP Support
POP3 Support
SMTP Support
How to Install IIS Prerequisites for Exchange Server 2003 on Windows Server 2003
Topic Last Modified: 2006-06-18
Exchange 2003 Setup requires that the following components and services be installed and enabled on the server:
- .NET Framework
- ASP.NET
- Internet Information Services (IIS)
- World Wide Web Publishing Service
- Simple Mail Transfer Protocol (SMTP) service
- Network News Transfer Protocol (NNTP) service
If you are installing Exchange 2003 in a native Windows Server 2003 forest or domain, none of these services is enabled by default. You must enable the services manually before running Exchange Server 2003 Installation Wizard.
 Before You Begin
 Important: |
|---|
| When you install Exchange on a new server, only the required services are enabled. For example, Post Office Protocol version3 (POP3), Internet Message Access Protocol version4 (IMAP4), and NNTP services are disabled by default on all of your Exchange 2003 servers. You should enable only services that are essential for performing Exchange 2003 tasks. |
Procedure To install IIS prerequisites for Exchange Server 2003 on Windows Server 2003 - Click Start, point to Control Panel, and then click Add or Remove Programs.
- In Add or Remove Programs, click Add/Remove Windows Components.
- In Windows Component Wizard, on the Windows Components page, highlight Application Server, and then click Details.
- In Application Server, check the ASP.NET check box.
The Application Server dialog box
- Highlight Internet Information Services (IIS), and then click Details.
- In Internet Information Services (IIS), check the NNTP Service, SMTP Service, and World Wide Web Service check boxes, and then click OK.
The Internet Information Services (IIS) dialog box
- In Application Server, ensure that the Internet Information Services (IIS) check box is selected, and then click OK to install the components.
Do not check the E-mail Services check box. - Click Next, and when the Windows Components Wizard completes, click Finish.
- Perform the following steps to enable ASP.NET:
- Click Start, point to Administrative Tools, and then click Internet Information Services (IIS) Manager.
- In the console tree, expand the local computer, and then click Web Service Extensions.
- Click Start, point to Administrative Tools, and then click Internet Information Services (IIS) Manager.
- In the details pane, click ASP.NET, and then click Allow.


Tuesday, July 14, 2009
Remove Boot error messeges
Hey dear its a virus, luckily your antivirus has already removed it from your pc. one trace is remains in registry which will try to load it on startup.
Ok, do the following step and get rid of it.
Open Run , type regedit and press enter
Go to
HKEY_LOCAL_MACHINE \ SOFTWARE \ Microsoft \ Windows NT \ CurrentVersion \ Winlogon
and check for the key Shell, the value of this must be Explorer.exe . if you can see some other after that like Explorer.exe C:\PROGRA~1\MYWEBS~1\bar\2.bin... , then remove the second file from the value, means it must only Explorer.exe
Ok, then check for the key Userinit. the value must be C:\WINDOWS\system32\userinit.exe, (including the comma) . If after that some thing is there , then delete it.
Ok thats all. restart your system .
Windows XP: Cannot change XP desktop
Be sure to scan the computer for malware as it frequently causes this type of issue, but there are registry problems, caused by malware, which can be fixed once the virus/spyware is removed. Since you are using XP HOME, you don't have the Group Policy Editory to use but try editing the registry entry below to get the display option to function again. I believe the Group Policy Editor changes the registry key below to alter the "Remove display in control panel". If you find the key as specified below, you should be able to modify the dword to "0" which would then cause your display panel to appear and work correctly.:
HKEY_CURRENT_USER\Software\Microsoft\Windows\CurrentVersion\Policies\System]
"NoDispCPL"=dword:00000001
You might also want to check into the tool below which should allow you to tinker with those display settings in a much easier way.. :
http://www.dougknox.com/xp/utils/xp_securityconsole.htm