Introduction
After completed part III, you have done basic configurations on ISA Server. In this part, you’re going to configure on client computer to be one of these types: SecureNAT Client, Firewall Client or Web Proxy Client. You can see more detail in topic below.
Client Types
The table below compares the ISA Server clients.
| Feature\ Client types | SecureNAT client | Firewall client | Web Proxy client |
|---|---|---|---|
| Installation required | Some network configuration changes may be required | Yes | No, Web browser configuration required |
| Operating system support | Any operating system that supports Transmission Control Protocol/Internet Protocol (TCP/IP) | Only Windows platforms | All platforms, but by way of Web application |
| Protocol support | Application filters for multiple connection protocols required | All Winsock applications | Hypertext Transfer Protocol (HTTP), Secure HTTP (HTTPS), File Transfer Protocol (FTP), and Gopher |
| User-level authentication | Some network configuration changes required | Yes | Yes |
| Server applications | No configuration or installation required | Configuration file required | Not applicable |
Configurations
On this section, I will how to configure each client type on a client computer. You only select one of these three client types configurations.
- SecureNAT client
To configure SecureNAT client, only change gateway in network properties to ISA Server - Firewall client
- Download Firewall Client for ISA Server at Microsoft or at here – Microsoft Firewall Client.
- Run setup program, set the ISA Server DNS name or IP Address on ISA Server Computer Selection page.

- After install, you’ll see icon as the figure below in task icon. The green color means the client has successfully connected to ISA Server. If the red shows, the client can’t connect to ISA Server. You can double-click on icon to see more detail.

- If you have double-clicked on previous step, select Settings tab and you can verify that ISA Server Selection is type correctly or not. Also, click on Apply Default Settings Now for other users on this computer can use this configuration,too.

- Web Proxy client
- Open Web browser. In this example, I demonstate on Internet Explorer.
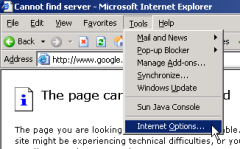
- On menu bar, select Tools -> Internet Options.

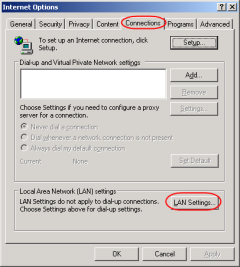
- On Internet Options, select Connections tab and click on LAN Settings.

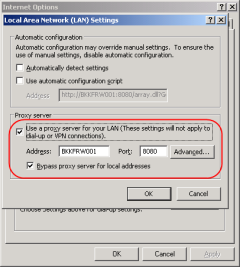
- On Local Area Network (LAN) Settings, set Address and Port to your ISA Server configuration.
Note: By default, Web proxy port is 8080.

Reference
http://technet2.microsoft.com


No comments:
Post a Comment